42 IKEA Hacks That Prove Even Inexpensive Flatpack Can Still Create a Designer-Look Home
Hacking some of IKEA's best-loved furniture and decor can help your home look expensive, elevated, and bespoke, while sticking to a budget

Aditi Sharma

I'm an IKEA hacker, so I know first hand that with a little lateral thinking and some DIY, you can achieve pretty much anything you want with the brand's budget-friendly furniture. IKEA makes brilliant basics, which are at the heart of any good IKEA hack, so that you can translate the latest trends in interior design into your own home, without breaking the bank.
Of course, it's not always as easy as it sounds, or as easy as IKEA hackers make it look. Some of the most inventive IKEA hacks use tools that are expensive, or that you need experience with. Personally, I've made-over cabinets, made IKEA's freestanding closets into built-in closets, and even done some pretty creative things with an IKEA fruit bowl (but more on that later), so I know what it takes to make your creative dreams a reality using IKEA as a base.
This list of IKEA hacks is pretty extensive, but I'm editing it down to the best examples and the best techniques for elevating flatpack furniture for a modern home.

How we've edited down the best IKEA hacks
As an award-winning DIY blogger and an interior stylist, I've pulled this list of some of the greatest IKEA furniture hacks together not only with an eye on the latest decorating trends, but also a practical understanding of how easy these projects actually are. I've rated their difficulty from one to five stars, based on the materials used, techniques required, and how handy you have to be with power tools.
1. Add scallops to a TARVA dresser

Difficulty rating: 2/5
Copying Danie's legs makes things a little bit harder, but the scallop design itself shouldn't be too hard if you've used a jigsaw before
While IKEA's furniture is often timeless in design, that sometimes means it can be lacking in details that make it feel designer. However, DIY content creator Danie Berger, of DIY Danie, took inspiration from the Samantha Dresser from Lulu and Georgia to add details to IKEA's brilliant basic dresser TARVA.
"I traced it onto the wood, went to town with my jigsaw, and sanded everything smooth," Danie explains. With new legs made from lumber and quarter-round trim, and a new coat of wood stain, this IKEA dresser hack looks almost unrecognizable.
2. Use LACK shelves for this creative wall display

Difficulty rating: 1/5
This no-cut DIY is ideal for people not experienced in power tools, though getting the spacing right for brackets might be a bit of a challenge.
If there's ever been an example of how IKEA provides the raw materials to create something beautiful and unexpected, this DIY is it. Interiors content creator Justin Miller, of @miztermiller, created this wall decor using IKEA's LACK shelves, simply fitted together in a different configuration. "They come in three lengths, and I played around with different options utilizing the different lengths, but ended up only using the 74" ones," Justin explains.
Justin used his wall hanging to frame a piece of art, but we can see this working just as well as an IKEA hack for around a TV, too.
3. Create a Trendy Bobbin Look

Difficulty rating: 1/5
The sanding is a bit of a chore, but worth it for the cool stained look. A painted version would be easier, however.
'Bobbin' furniture is a big trend right now, and though it can be expensive to buy, DIYer Kristen Culson of @something.renewed showed us this brilliant trick for recreating the look using just these half wooden spheres from Amazon.
As an IKEA Hemnes hack, Kristen says: "These nightstands had the typical white IKEA factory finish on them [but] I knew this line of IKEA bedroom furniture was made of solid pine," meaning she could sand it back. Then, she simply glued the half spheres in place, before unifying the wood color using a wood stain. Super simple, yet super effective.
4. Frame fluting within your IKEA furniture

Difficulty rating: 2/5
You'll need to use a chop saw, accurately, for a good finish.
Home renovator Emma-Jo Woollin of @mysecrethouseaccount turned her KALLAX from lackluster to a great IKEA dresser hack for the entryway.
She used the KALLAX doors for her fluted IKEA cabinet hack and added molding. "We used half-round pine molding and cut them to size (8.6 inches) using a chop saw to cover each door, using sandpaper to file the edges," she explains. She then attached them to the doors with No More Nails adhesive, available from Amazon. A quick drying miter glue can also be useful when you need to adhere quickly, without a glue curing time, or by combining adhesive glue with a fine nail gun, filling the holes afterwards.
To contrast the white walls in her lofty living room, she used a KALLAX door "to get a color match service, mixing the paint the same color as the unit," she says. "I gave the doors three coats of color." Finally, she used gold handles and matching feet from Amazon, to raise the credenza off the floor.
5. Use fluting as an overlay

Difficulty rating: 2/5
With larger molding pieces, and fewer cuts to make, this project will be quick to achieve.
If you want your cabinet hack to make a big impact then look no further. This simple but effective hack will transform your IKEA IVAR cabinet.
Lau from @living.bylau gave her IKEA IVAR cabinet an upgrade by adding some cool texture and a splash of pink, creating a classy finish. She glued wooden sticks onto the cabinet at a horizontal angle before coating it in Gamma’s Texel paint and adding furniture legs from Amazon. For the console table decor, she added display pieces and ornaments to get a modern look.
6. Add paint techniques to your fluting

Difficulty rating: 3/5
This hack requires some pretty precise and meticulous painting to make the effect come to life
This IKEA furniture hack is one of my own, a slightly different take on the fluted trend by adding a graphic painted design to the front.
To get the fluted effect on the front of the cabinet, I measured the inset of the cabinet door and cut some half dowels to size. Place all the dowels roughly on the door and start to mark out your pattern with a pencil. Then, using a fine painter’s tape, I taped over the lines. I started on the outside of each line so that I could paint the center section first.
I chose a wavey design in a neutral color palette using leftover paint. Consider two coats for a rich color finish. I then stuck the dowels to cabinet. Start on the inside edge, and if you find that the dowels don’t fit exactly, you’ll need to sand down the edge on the last dowels to be fixed. Once all the dowels were stuck down, I gave the whole cabinet a once over with a clear, matte varnish, like this one from Amazon, that is hard-wearing.
7. Use fluting for the back of shelves

Difficulty rating: 4/5
Neat and precise, this IKEA furniture hack is a labor of love, but totally transforms the space.
Designer Claire Douglas renovated her living room by customizing the HAVSTA cabinet. "I wanted the larger section in the middle of the unit, so I decided to move the central, structural shelf. This was easy to do and just required a couple of new drill holes," Claire explains.
She built and attached her frame to the MDF panel to add both units to the wall. The designer then added an MDF panel to cover the gap between the top of the units and the ceiling – to emphasize the bespoke aesthetic.
She then added lights by attaching the frames of the units with screws and a piece of wood to the ceiling to ensure they were sturdy.
Once Claire had completed the main structure, she added more MDF strips around the edges of the unit. "This gave the appearance of thicker wood on the unit and allowed me to balance out the width difference between the top and bottom units," she says. Fluting was introduced on the back of the cabinet, for a twist on the trend.
As with every great hack, Claire decided to change the HAVSTA's handles. In this case, she used some half-moon-shaped handles that elevated her unit further.
8. Update cabinets with BJÖRKÖVIKEN doors

Difficulty rating: 4/5
Introducing kerf cuts to get a solid piece of wood to bend isn't for the faint of heart, and may need speciality cutting tools
This transformation comes from Annie Williams of @champagne.chaos, an Ohio-based designer who renovated her home in Columbus. Annie was inspired by Arhaus’s $3,000 Finnley Media Cabinet – a mixed-material focal point complemented by luxe white marble.
For this IKEA entertainment center hack, she chose the IKEA BJÖRKÖVIKEN cabinet doors "because they looked so similar to the $3,000 fluted Arhaus media console that I love so much," Annie says.
"Four IKEA BJÖRKÖVIKEN cabinet doors made up the shell," Annie says. "The most difficult part was getting the MDF cabinet doors to curve on the sides, using kerf cuts." According to the designer, the Kerf cuts were a series of close-together cuts that she made down the back of the wood – almost but not all the way through.
After completing the fluted doors, Annie cut a curved top from the plywood for the top of the unit. She then built platform legs for the bottom and painted both. "I also attached to studs for added support since the piece is heavy," Annie adds.
9. Consider IKEA overlays to give furniture an elevated look

Difficulty rating: 1/5
These easy-to-attach overlays will transform a cabinet door instantaneously.
"IKEA overlays are custom-made pieces designed to fit specific IKEA furniture items," explains Lotta of Norse Interiors. "They can be made in various materials, such as wood, metal, or plastic, and come in different designs, patterns, and colors."
These are a great way to transform and personalize regular IKEA furniture into unique, bespoke, and elevated pieces that better match a person's interior design tastes. "Overlays are lightweight, paint-able, and easily attach to furniture, doors, walls, and glass," explains Cheryle Rhuda of O'verlays. "They're more than just an IKEA hack - they are used as mullions on kitchen cabinets, upgrading doors, wall coverings, and can be used on any flat surface in your home."
To attach these, all you need is adhesive or other mounting methods provided by the overlay manufacturer. You can also switch out the whole front of the IKEA furniture by replacing the entire doors. Overall a great weekend project!
10. Upgrade IKEA doors with this modern design

Difficulty rating: 2/5
If you're well acquainted with a chop saw, this hack is pretty simple.
This IKEA IVAR hack was inspired by a designer piece of furniture. I created a striking cabinet, using small square and rectangular-shaped panels stuck onto the doors' surface.
I cut 56 blocks out of leftover sheet timber using power tools. It's so important to number each piece as you do it. They're all a similar size, but slightly different, so without the numbers, it'll take you forever to find the right order to put them in.
I used a Ryobi Palm Sander (available from Amazon) to sand the edges. Since the IVAR sits on the floor, I chose some simple bun feet from Amazon to raise it up slightly. I finished it with furniture paint that didn't require priming first. Because the IVAR is untreated, it's a super easy piece of IKEA furniture to paint. I finished it with a matt varnish. And there! The piece looks as good as store-bought.
11. Use cane webbing doors

Difficulty rating: 1/5
This hack uses a store-bought door, painted in a different color.
If you fancy giving your IKEA cabinet a modern update, this hack is a great idea. Emily @blu.j.designs has the perfect hack.
"I was on the hunt for a buffet that was 12" deep by 66" long but everything I was finding was way over my budget," says Emily. "When I found the IVAR system I knew I found the perfect piece. Using two IVAR cabinets and doors, we painted them with Dixie Belle's Caviar Chalk Mineral Paint and Satin Clear Coat. The doors were 1/2" too wide, so we cut 1/2" off on each of the strike sides of the doors. We screwed the bases together to create one piece, added HAOTH antique handles from Amazon, and 6 gold spray-painted Waddel legs from LOWES."
12. Or add cane to existing doors

Difficulty rating: 2/5
Adding cane webbing to doors is super easy, and you can cut your door with an easy-to-use jigsaw tool.
Take your IKEA BESTA TV stand to another level with this fun hack. Kalthouma of @baytkalthoum describes how she turned her BESTA into a showpiece. "For this IKEA cabinet hack, I kept the BESTA doors and had them cut geometrically," says Kalthouma. "I had to cover the sides that were cut with lipping for a seamless look. I then glued cane on the doors' back and added knobs on the front that I found in Zara Home." The easiest TV mounting idea!
13. Make a cool apothecary cabinet with IKEA MOPPE

Difficulty rating: 2/5
Some simple cutting and addition of new pulls make this an easy project
The unassuming mini MOPPE drawers are perfect IKEA hack fodder. Get creative like @patirobins and make a trendy vintage-style apothecary cabinet for living room storage, made with four mini moppe drawers.
"I trimmed the top row as I wanted the cabinet to look more rectangle, then glued the 4 cabinets using adhesive, framed it with wood, and then attached four hairpin legs," says Pati. "I also turned the drawers the other way around so I was able to attach my own drawer pulls - giving it a library look. You could wax or stain it for a more retro feel." Try these library drawers pulls from Amazon for a similar look.
14. Turn a dining table into a designer desk

Difficulty rating: 1/5
A simple paint job any beginner DIYer can tackle
Who'd have thought a small home office could become such a stylish space? The budget Ingo table has been transformed into a sleek desk perfect for a modern house by Ruth of @mrs_macs_home.
"The INGO is a small dining table but also makes a great size desk,' says Ruth. 'It’s also so easy to makeover as it’s made in untreated solid pine, so it's perfect for painting/staining etc."
"I painted the lower base and legs in Farrow & Ball Modern Eggshell in Railings and then lime waxed the top with Liberon liming wax."
15. Overhaul your office with this IKEA Hack for Alex drawers

Difficulty rating: 3/5
Cutting down hardboard to cover the drawers makes this project a little trickier.
We'd be motivated to start work if our home office looked at this. Instagrammer Jyll Mackie of @jyll_mackie cleverly created an IKEA office idea with some IKEA ALEX drawers into a feed-worthy IKEA desk hack.
So how did she do this IKEA hack? "I used two ALEX desk drawers as my base," says Jyll. "I love the functionality of these drawers, especially with the drop file folder drawer but I’m not a big fan of the look."
"I used a 2’x4’ piece of 1/4” hardboard and cut it down to cover each drawer," says Jyll. "I cut strips of the same hardboard to create the 'shaker' style front. I used construction adhesive and clamps to fasten these to the ALEX drawer fronts. I primed and painted the whole desk. Once dried I added hardware. I built my desk top out of birch plywood but you could use the desktops from IKEA. The cost of hacking the actual drawers was less than $20 (hardboard + adhesive)."
16. Introduce designer style to a drab Alex drawer unit

Difficulty rating: 2/5
Fixing the cane webbing to the front of the drawers may be even easier than fixing to an open hole.
Rattan and cane are a popular interior design trend, popping up on furniture from chairs and beds to cocktail cabinets and more. We love how DIY-er @handymacly has brought this seventies style into the study with an elegant overhaul of IKEA's Alex desk drawer unit.
She assembled the desk without the drawer fronts and sawed the cleats using the miter box (to get precise angles) to the dimensions of each of the drawer fronts and sanded them down.
She painted the wooden cleats black with two coats and stapled the cane directly to the drawer fronts. Once the cleats were dry, she glued them into place on the drawer fronts and fixed them with clamps while they dried overnight. Finally, she screwed the new gold handles behind the cleats for a total transformation.
17. Turn an IKEA fruit bowl into a side table

Difficulty rating: 4/5
Cutting curved legs to fit a sphere makes this project a hard one to get perfect.
Everyone has owned a wooden fruit bowl but how many of us have realized its potential as a stylish furniture piece? I decided to DIY this $25 IKEA fruit bowl by drawing around the bowl on a piece of MDF, and cutting out with a jigsaw. Since he needed to give the table thick legs, he stuck the pieces of MDF together with adhesive. Once dry, he drew around the edge of the bowl and cut the line out with the jigsaw too.
I then drilled eight holes in a cross across the Blanda bowl with a thin drill paintbrush. Turn the bowl over, and on the inside, drive a screw through into the top of the legs with an electric screwdriver. I then applied skimming plaster over the table and then sanded it. To finish it off, I painted the table with a stone-effect paint with a little grit in it to create texture, using a paint brush.
If you want to make your table look even more striking, place interesting side table decor pieces like vases and candles atop.
18. Design a side table using IKEA RÖDEBY bamboo armrests

Difficulty rating: 2/5
Easy to put together, this DIY furniture is a super simple make if you can cut the bamboo armrest.
Want to give your living room furniture a brand-new look? This upcycled side table is a great example. Made using a plant pot, a lazy Susan tray, and a bamboo slatted armrest, all from IKEA, home renovator Kerry Kellett (@klk.interiors) was able to come up with a great IKEA coffee table hack emblematic of organic style. To design this piece, she used one large IKEA NYPON plant pot for the base, two IKEA RÖDEBY bamboo armrests as the wood veneer wrap, and a SNUDDA Lazy Susan as the tabletop.
"I wrapped the first armrest around the pot and then measured the remaining space," says Kerry. "Using the second armrest I cut a piece to size and filled in the gap." She then made the tabletop by removing the base from the lazy Susan so she was left with just the tray. "Flip the pot upside down so the base is at the top," says Kerry. "You then need to apply adhesive to the base of the pot and place the top of the lazy Susan onto this." Once dry, Kerry painted her side table with furniture wax to give the IKEA veneer a more rustic effect with a darker tone.
19. Repurpose a chic wireless mushroom lamp with KARAFF and BLANDA

Difficulty rating: 1/5
Turn 3 simple IKEA buys into a designer-look table lamp.
Madycke Elisabeth of @madison.mea used just three simple IKEA items and a few basic materials to design a wireless mushroom lamp from scratch, adding to a long list of IKEA desk hacks.
"My mom got me the 'KARAFF' vase, 'BLANDA' bowl, and the 'KORNSNÖ' lamp," says Madycke. "To protect the outside of the vase and bowl I first taped it off. Then I covered the inside completely using the spray paint," she says.
She colored the outside in a beige-mushroom tone. Then she placed the vase on a table and kept the KORNSNÖ light face down into the vase. Then covered the BLENDA bowl and place it upside down so that it rested on top of the light. When you push it down, you activate the push button on the light, turning on the lamp. Voila!
20. Design Mediterranean-style shelves using KALLAX

Difficulty rating: 4/5
There's a lot of process to this Kallax hack, but it has an uneven finish by design, which makes small mistakes less noticeable.
Alice, a decorator and DIY expert of @homeflufflyhome has used an IKEA KALLAX hack to create the most eye-catching shelf. "I thought the original KALLAX was way too plain," says Alice. "While useful, IKEA furniture is always very square and symmetrical and everyone has the same, so I wanted something a bit more individual."
For this, she began by removing the boards to create a less ordered look. After this, she applied Styrofoam sheets to each shelf to build up the width and create that rougher, textured appearance...much like a Mediterranean-style unit. "I then created rounded shapes in polystyrene sheets, which I glued to some niches," Alice explains. Once it was dry, she coated the entire piece of furniture with white tile mastic.
Finally, she sanded every surface and added a protective wax to improve the durability of the shelves.
21. Turn a pretty HEMNES unit into a beachy, coastal gem

Difficulty rating: 1/5
Beyond repairing this design, Ebony's paint makeover is a simple project.
Furniture renovator Ebony Basten says, "I found a broken HEMNES unit for $30 on the marketplace. It had no back, a split drawer, and dodgy drawer runners."
A perfect IKEA hack for a small home, she decided to first purchase a 0.4-inch MDF slab and cut it to size to build a new back. She glued and clamped the drawer to fix the split, and finally adjusted the runners to help the drawers glide smoothly.
She painted the unit with Feast Watson Liming White timber stain and then primed the piece using Dulux’s Precision Maximum Adhesion. And then finally did a last brush with Fusion's Eucalyptus mineral paint. Ebony even added hand-painted details to the drawers to make her IKEA HEMNES extra personal.
22. Use gilded paint for a glamorous finish

Difficulty rating: 1/5
Metallic paints are a little more involved to use than standard ones, but it's an easy project nonetheless.
Inject a splash of glamor to your sleep sanctuary with this chic IKEA nightstand hack by Leoma Harper, interior stylist of @styletheclutter.
"During the first lockdown I was on an upcycle mission," says Leoma. "These IKEA HEMNES bedside tables ended up being victims of this and now have a completely new look."
"The new aesthetic was created using primer, followed by two coats of the lovely Fusion Mineral Paint in Ash, some gold leafing on the drawer, and finished off with a new handle from Anthropologie. I love how a new piece of furniture has evolved through this spontaneous paint over."
23. Give your chest of drawers a cool geometric look

Difficulty rating: 2/5
Getting good, clean paint lines from a stencil is a skill in itself, but spend some time practicing and this project won't prove a challenge.
If you’re looking to get creative with your chest of drawers, then Courtney of @steelbirchstudios has a quick and easy hack for you.
"A bit of a spontaneous hack, I found this Lime Green IKEA TARVA Chest ditched on the side of the road," says Courtney. "I’d been waiting for the opportunity to use my Linear Tile Stencil from Cutting Edge Stencils - and it was the perfect candidate. I first sanded it down and applied primer. I went with a base of Raw Silk and stenciled the pattern using Coal Black (both by Fusion Mineral Paint). I kept the base natural, tapered the front legs just a touch and, finished with small brass knobs. It’s a brilliant pattern that would work on almost anything."
"The design unfolds slowly as you turn the stencil in different directions. It’s really fun to use."
24. Give an IKEA Stockholm a sleek makeover

Difficulty rating: 1/5
A very simple paint makeover.
Lauren of Elsie Home transformed her IKEA STOCKHOLM sideboard with this quick and easy hack. Ideal for living room or as a dining room buffet.
"The IKEA STOCKHOLM sideboard is made with a walnut veneer, so it was important to use a good primer," says Lauren. "We used Kilz primer, here on Amazon, since the veneer couldn't be sanded and then painted with Benjamin Moore Caldwell Green paint. I chose to leave the legs unpainted to give the piece a bit more dimension."
25. Utilize IKEA PAX to upgrade your laundry room

Difficulty rating: 4/5
Choosing an unpainted finish means Kerry had to be very clever with this laundry build.
DIYer and lifestyle influencer Kerry Kellett wanted to make her laundry room more organized and functional. "We created a large utility/built room in what was the old kitchen in our house," she says. "I wanted this space to be practical, and functional, but also easy on the eye."
For this, she decided to get creative with a DIY IKEA storage hack using the PAX system. "I started by building a frame on the wall and floor using CLS timber 3x2," she says. "This creates a sturdy base for the carcasses to sit on, but also raises them off of the floor, so the skirting board can sit across the front." She then secured the units by fixing them together, then raising the waste plumbing for her washer. Kerry then used spruce pine timber all the way around on the metal shelf brackets for strength. "Finally, the last step was then adding the skirting board to the front of the unit." This gives the entire hack a built-in look that looks so professional/
26. Go for built-in storage using IKEA PAX and BESTA units

Difficulty rating: 2/5
Less "built-in" than other hacks, this project is on the simpler side for a bespoke look that won't take you forever.
Home renovator Lacey Moldow (@loft.flora) wanted to expand the storage in her Atlanta home and decided to take the designer IKEA hack route. For the living room, she used two PAX wardrobes and a BESTA unit in the middle of the room. "I then had to reconcile the differences in base height and depth to make them look like one cohesive built-in unit," she says. "The 29-inch PAX units that fit within my space only came with the option of one larger door and one tiny door. That just looked wonky to me and I wouldn't have it, so I ended up having to buy two of the larger doors and cutting them both down to size, then using some paintable iron-on edge banding to clean up the edges."
After that, she built a wooden platform from 1x3 boards so the middle BESTA unit could sit flush with the PAX units on either side. To give the units a customized look, she painted them the same color as the walls in that room, which is Warm Blush by Benjamin Moore, but she used a Zinsser's B-I-N shellac primer first. All in all, this project proves that storage ideas for small spaces can be seriously stylish and that a DIY bespoke approach is the way to go!
27. Add a new built-in media wall with EKET cabinets

Difficulty: 4/5
Linsey used some complex techniques to construct the floating shelves in this hack.
Multifunctional storage is the name of the game. Home renovator Linsey Learmonth of @thedcdiyer wanted to boost the functionality of her living room and decided to use some of the best IKEA products for alternate uses. She used three EKET cabinets with double doors and one single-door cabinet, as well as four sets of EKET double drawers to create a weall storage unit.
"I'd already assembled and lined up the EKET cabinets and secured them to the studs," she explains. She added a pine top to the surface of the cabinet. "For this, I used pocket holes, rounded the edge, and then sanded, stained, and sealed before attaching from the underneath, inside the cabinets," Lindsey explains.
"I built the upper shelves using ¾ plywood and dado joints, and attached the whole structure to the wall with floating shelf pins," says Lindsey. She then dge-banded all the rough edges and used a stain to match. Not only did this turn out to be a great DIY project, but it also saved her thousands of dollars.
28. Fashion a stylish fireplace surround with OXBERG doors

Difficulty rating: 4/5
This project, with its bespoke curves and built-in cabinets, took weeks in the making.
Home renovator Melanie Boyden of @melaniejadedesign used an IKEA BILLY bookcase hack to create built-in shelving in just a few simple steps.
She bought 15 3/4 inch wide BILLY units, as well as OXBERG doors, an MDF sheet to cut the arch shapes, trim to go around the edges of the bookcases, and strip wood to give the doors their ribbed effect. "I also used an old worktop from our kitchen as a hearth and a large shelf to act as a mantelpiece," says Melanie.
She built the BILLY units and bound them together and attached them to the walls. Then she used the MDF sheets to fit the front of the bookcases and took it up to the ceiling for the built-in effect. She measured the recessed panel on the OXBERG doors and cut the strip wood for the ribbed effect. She also fixed BASE boards to the bottom of the cabinets to hide the bottom of the bookcases.
It took her four weeks to complete the entire shelving project; but at a nominal cost.
29. Add kitchen cabinets in an entryway

Difficulty rating: 2/5
It's mostly piecing IKEA cabinets together in the right way, with less cutting of new materials required.
Sophia Hardy of @sophia.at.home, used IKEA kitchen cupboards to create chic coat and hallway shoe storage cabinet.
'"We knew we wanted built-in storage in our entryway, so when the time came to renovate, we had a few quotes from local carpenters for some cabinets to be built - these were way out of budget," Sophia explained.
The designer sketched out what she wanted the storage to look like – most primarily; she wanted four doors to accommodate the four people in her home. She also wanted additional shoe storage and planned to maximize the historic high ceilings by building up by 10 feet.
Sophia used 12 wall cabinets in total – before setting up the lower four to create a ledge. She then chose shaker-style doors with low, closed hinges and ordered the minimalist golden handles separately. The designer also added timber on either side of the cabinets to ensure they remain in place.
30. Add moldings to an IKEA BILLY

Difficulty rating: 2/5
Adding the molding around the edge is an easy way to make the BILLY look more built-in.
This clever idea is courtesy of Liz of @prettyprospectcottage, who used BILLY bookcases to create a built-in alcove that stands as an exhibition space in her living room.
Using two slim BILLY bookcases, Liz created a raised platform at skirting board height from CLS timber (screwed securely into the back wall) and a piece of MDF. This was for the units to stand upon. "I [then] put the bookcases on top and fixed them to the wall with small blocks of CLS timber and metal brackets," she adds.
To emphasize the ‘built-in’ style, Liz then made a frame surround for the units using molding that matched the paneling details elsewhere in the room. ‘I added a piece of skirting board along the front bottom edge and had a strip of timber cut to fit the gap in the middle,’ she explains.
Once the units were in place and prepared for painting, Liz finished with a coat of matt varnish.
31. Style a modern planter with IKEA bed slats
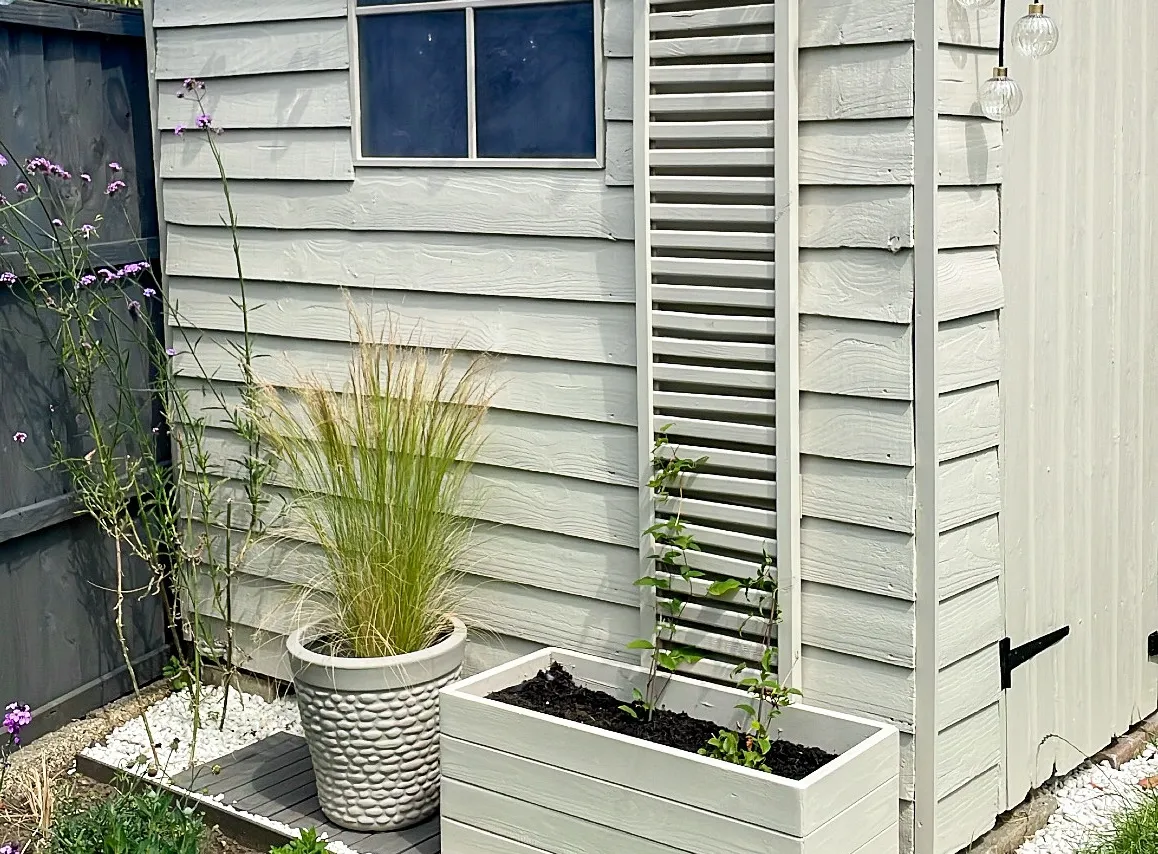
Difficulty rating: 2/5
Get comfortable using a chop saw and this project will feel simple.
Seasoned DIYer Deborah Stubbington of @bangonstyle used a store-bought trellis, a lick of paint, and some old IKEA bed slats to create a modern wooden planter. "I had to strip off all the webbing and the staples off the bed but once I’d done that, they were the perfect length for a planter," says Deborah. She used her miter saw to cut the ends of each bed slat. Once she had the four panels to make up the planter, Deborah screwed them all together to form the sides.
To create a base, Deborah bought wider wooden slats from a store and arranged them on one end of her planter, leaving gaps in between for drainage. "I also added feet to the base of my planter using two offcuts of bed slats to raise it off the floor." The perfect, most budget-friendly IKEA garden hack!
32. Transform an IKEA BILLY bookcase into a dressing table area

Difficulty rating: 3/5
Robyn built out this custom vanity between two IKEA products.
Feel like a film star every time you get ready with this ingenious IKEA Billy bookcase hack by Robynof @the_house_acc.
She used two BILLY Bookcases and two IKEA OXBERG glass doors to create the ultimate IKEA hack, forming these dresser units. Robyn used Frenchic Paint's Black Jack for the doors before adding reeded adhesive film by Glass Films Europe to create the on-trend fluted glass effect. We're a little starry-eyed over this one.
33. Split moldings across IKEA wardrobe doors

Difficulty rating: 3/5
You'll need to learn to cut miter corners with molding to achieve this look.
What do you do when the IKEA PAX wardrobe isn't quite grand enough for your glam bedroom? Elevate it with an upscale IKEA hack, of course.
CleverThe clever duo Kevin and Sarah of @readmorehouse did just that. "When faced with a no-closet master bedroom in our late-1800s Victorian Italianate home, we hacked the IKEA PAX system to create a character-filled, built-in wardrobe system that looks like it was always here," say Kevin and Sarah.
"We added crown molding, baseboard, and wall trim to match the original profiles in the room, seamlessly blending the wardrobes into the architecture," share Kevin and Sarah. "Finally, oversized 18" brass pulls add a touch of modern Victorian luxury."
34. Customize built-in shelves with 4 BILLY bookcases

Difficulty rating: 4/5
It's an involved DIY which will need some skill in getting the finishes looking perfect.
Home renovator Rachael Young of @firsthouseonfinn created shelves with an IKEA shelving hack to transform her front room. "The room was previously a workspace that I no longer needed," she says. "It also wasn't my style and didn’t flow with the rest of my home." She decided to keep the desk, add more seating, and create her DIY shelving for extra storage.
She and her partner assembled one BILLY bookcase unit, to get an ideal spacing between each set of shelves. "We had to figure out how many bookcases and how many height extensions we would need for our space," Rachael explains. Between each unit, they installed 2x4s. For a seamless look, they used 1/2 inch MDF for the faces and arches. Once they nailed the arches, the couple reattached the crown molding at the top for a truly built-in appearance. They finally sanded and coated the exterior, and painted the walls, trim, baseboards - everything but the ceiling - in Cinnamon Sugar.
35. Convert BESTA cabinets into sideboard storage

Difficulty rating: 3/5
A simpler built-in IKEA cabinet hack to try if you've never done one before.
Home renovator Fiona White of @ourstaffordshiresanctuary noticed the potential of alcoves on either side of the fireplace and wanted to experiment with an IKEA built-in hack. 'We already owned one of the BESTA units and so decided to give it a go ourselves with an IKEA hack,' says Fiona.
"We built a base for the unit at the same height as our baseboards," Fiona explains. "Then we ordered a thick piece of MDF cut to size to make the tabletop." In a clever manner, she blended the sideboard with the rest of the home with the trim that gives the storage a classic paneled effect. "After adding molding and skirting, we caulked all the gaps and then primed and painted using the same color as the walls," says Fiona.
36. Use IKEA PAX wardrobes for a built in bedroom storage

Difficulty rating: 3/5
Cutting the IKEA system down isn't so difficult, but you'll need to be careful in cutting new doors for your storage.
Home renovator Sophia Nikolaides of @1894home decided to put her Ikea PAX wardrobes for a fresh, new bedroom storage hack. "When we came to finding a solution to an awkward nook under our bedroom eaves, we decided to use the IKEA PAX," she explains. "We cut the sides of the unit to fit under the slope and used the provided fixings to make it sturdy," she says. "Then it was a case of getting it in place for the doors."
To ensure that the storage looks seamless, she added slab doors. She then painted a soft neutral on the doors as trim; the same as the walls to create a unified aesthetic.
37. Create a sleek built-in shelving unit with Ikea BILLY bookcase hack

Difficulty rating: 3/5
You'll need to be able to cut large sheets of timber for the fronts of these cabinets, but otherwise it's a simple project using the BILLY system.
Who knew an IKEA BILLY bookcase hack could look so stylish? We love how Elisha of Our Aesthetic Abode has transformed the shelving unit into a modern display piece.
"I started with two IKEA BILLY bookcases and then I framed around them using 2x4s," says Elisha. "I then cut 1/4” birch plywood with an arch detail for each shelf and nailed this facing to the 2x4 frame. I used a shellac-based primer first (BIN) and then Sherwin Williams Emerald paint in Urbane Bronze!"
Perfect for book organization, plant pots, or display items, this is a super chic addition.
38. Create a split wardrobe with IKEA PAX

Difficulty rating: 3/5
Building plinths and a few other built-in elements isn't the hardest IKEA wardrobe hack, especially when the PAX does most of the hard work.
Looking for IKEA bed hacks? Now this is clever. The hard work of Charlotte and Ben of @new.house.home has certainly paid off with this elegant built-in wardrobe.
The couple brought together two IKEA PAX wardrobe frames with four GRIMO Doors and two BORGHAMN handles. Charlotte explains: "The first step was to build a plinth for each of the IKEA PAX wardrobes to stand on. The idea of this was to raise them a bit, creating a more built-in and elegant feel."
"We then used Medium-density fibeRboard around the edges and top of the wardrobe to box it in, using wooden battens hidden behind the MDF to hold it in place."
"After using more MDF to build the shelves in between the wardrobes, we corked and filled around the edges to make it look seamless with the walls" says Charlotte. "We then lightly sanded down the wardrobes, before priming them & the shelves. Finally, we painted the wardrobes and the entire room in Farrow & Ball Setting Plaster. We used Eggshell paint on the wardrobes and shelves to give them a slight shine, and then used Emulsion on the walls."
39. Use this IKEA METOD hack in the bathroom

Difficulty rating: 2/5
Cutting down the cabinet to be slimmer for a small bathroom is the biggest challenge for this project.
If you fancy giving your modern bathroom a makeover, now you can give thanks to @eakerblom and @viccee, using their IKEA METOD cabinet hack.
‘First, we cut down on the depth by 3 or 4 inches so it would be the right fit for the bathroom,' says Erik. 'Then we added drawers using IKEA BODBYN fronts and cover panels. The piece between the cabinets and the countertop is not from IKEA, just added for a more built-in look.’
‘We then sanded down the cabinet before adding two coats of Jotun’s LADY Supreme Finish paint as we felt the grey gives a more harmonic feeling with the marble and brass.’
40. Give your cabinets a stylish update with the EKET IKEA hack

Difficulty rating: 2/5
This project might be a bit trickier if your cabinets don't fit exactly as Harriet and Luke's did.
If you’re looking to spruce up your EKET cabinets, then Harriet and Luke of @twentyfivehome have the hack just for you.
"We measured our living room corners and the IKEA EKET cabinets fit perfectly on each side of the chimney breast," says Harriet. "After attaching them to the wall (2 units in one alcove and 3 in the other), we cut MDF panels to size to fit down either edge and along the bottom of the units. We also added an MDF top which we had edged with a router to give it a nicer finish."
"For the doors, we glued decorative beading and caulked the gaps to make them look seamless. Finally, we primed and painted everything to match the wall color, apart from the top which we painted white. So pleased at how they turned out, especially as it saved us a huge amount of money."
42. Fashion an ultra-modern cabinet with this IKEA BISSA hack

Difficulty rating: 2/5
A simple tidy up and paint, with new handles, transforms this project.
If you fancy giving your IKEA BISSA cabinet a sleek finish, Raden of @radenayu has got the perfect hack.
"I used two old IKEA BISSA units for this hack and started by scraping off the laminate which was already peeling as well as filling any holes or dents using a wood filler," says Raden. "I then proceeded to prime the cabinets before painting them with macchiato color. I used 3 coats of paint and sanded them in between each coat. To elevate the whole look, I added a half-circle gold hardware onto each door."
"Because IKEA BISSA is relatively bigger than the narrow IKEA HEMNES shoe cabinet, you can put stuff on top of it. You can just decorate the cabinet as an entryway storage or make it a home command center like I did."
FAQs
What does IKEA hack mean?
IKEA hack means decorating IKEA furniture using Do-It-Yourself skills. The idea is fairly simple: a person buys a piece of furniture from IKEA and changes, alters, or decorates it using DIY hacks.
Whether it's a simple paint job or reconstructing the furniture altogether, DIY hacks allow you to give your IKEA furniture a simple upgrade.
Is IKEA cheaper than DIY?
IKEA tends to be cheaper than DIY as it's possible to make the item you want using affordable IKEA parts rather than spending more on raw materials to make shelves or desks, for example.
It does depend on how much you spend on your materials, but since IKEA does simple household items so well, your best option might be to invest in IKEA items and use DIY hacks until you get the look you want.
Can you sit on IKEA furniture?
Many IKEA hackers repurpose the likes of cabinets into built-in seating, but if that a good idea? On each IKEA product, you'll be able to find the maximum weight limit. As the IKEA EKET is a small cube-shaped cabinet and can hold around 15lbs per shelf, while the KALLAX has maximum load per shelf being 28lbs, for example.
If it's not designed to be a seat, we wouldn't suggest sitting on IKEA furniture unless you're able to reinforce it through the hack itself. Adding extra supports, brackets and fixings may be able to make your furniture sturdier to sit on. There won't, however, be a way to test this new load capacity, so you'll have to use your own judgement, and have it be at your own risk.
