9 IKEA garden hacks - easy ways designers have elevated their outdoor space
These IKEA garden hacks will get your outdoor spaces guest-ready. All you'll need is a craft kit and some inspiration
The Livingetc newsletters are your inside source for what’s shaping interiors now - and what’s next. Discover trend forecasts, smart style ideas, and curated shopping inspiration that brings design to life. Subscribe today and stay ahead of the curve.
You are now subscribed
Your newsletter sign-up was successful
IKEA garden hacks are the Springtime DIYer's perfect pet project. For it doesn't matter whether you prefer potting and planting, or kicking back with a cocktail. Turning the outside into an extra room, where you can entertain friends and family, grow your own veg or simply relax, doesn't have to drain your wallet, if you're canny.
With the brand's hackable furniture and accessories, it's easy to achieve designer good-looks for your garden, with a bit of effort and enthusiasm - not to mention a decent tool kit.
There's an impressive array of IKEA hacks from interior designers and influencers alike. We love what they have achieved with their creativity and chutzpah - and we think you might too.
IKEA GARDEN HACKS
1. Transform a Tarva bed into a swinging porch seat
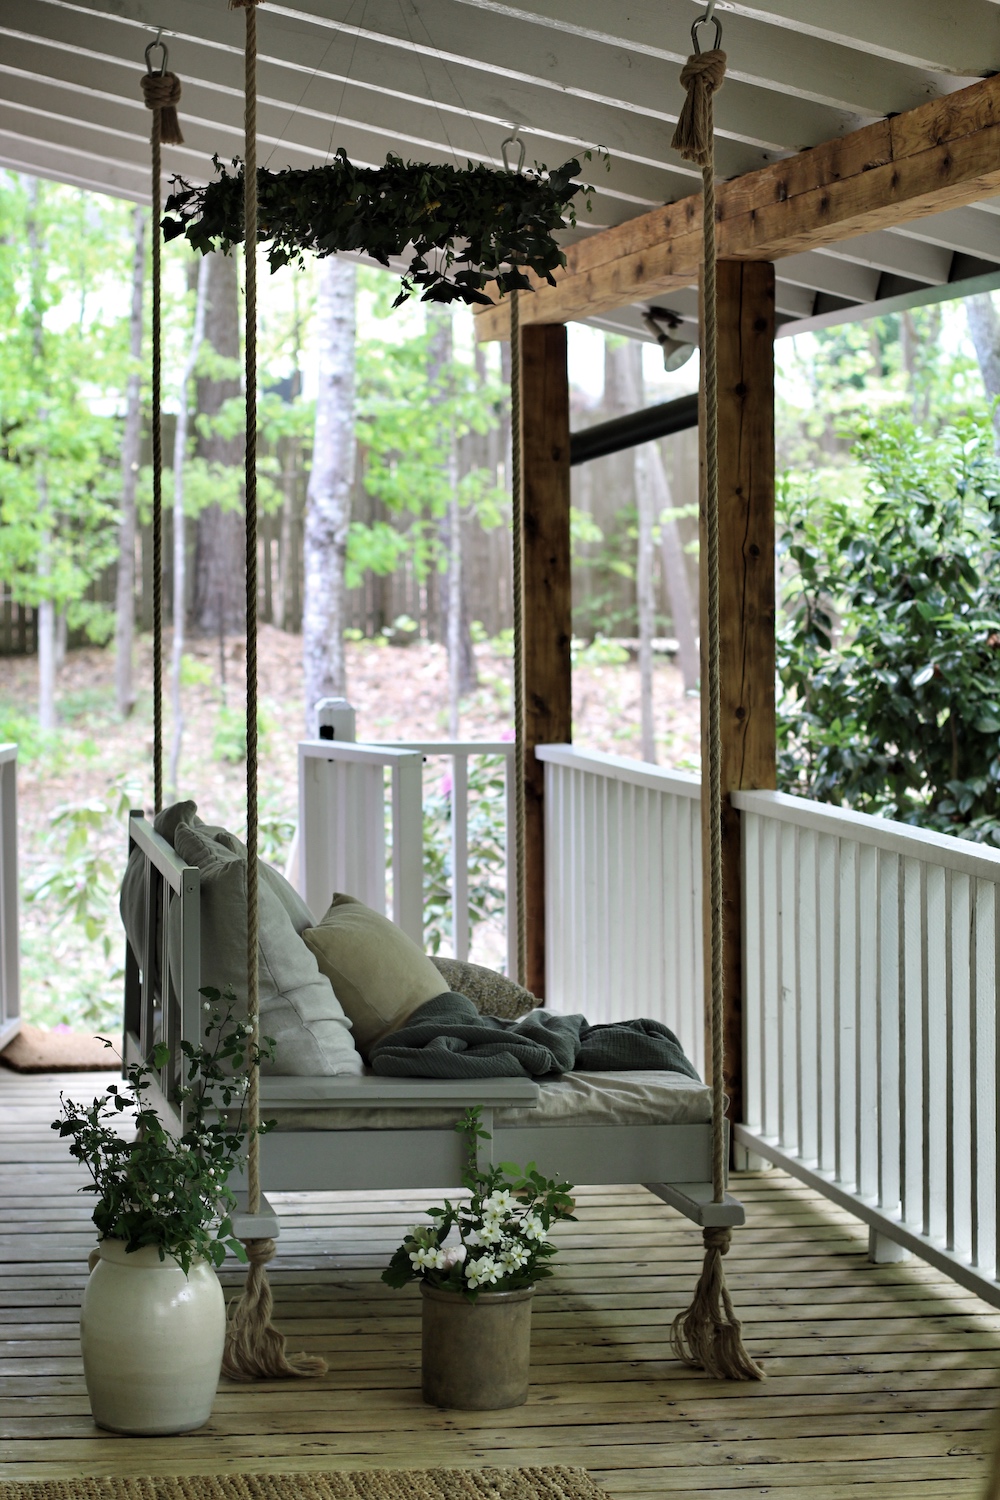
Interior designer, Hanna Soderstrom of @homeathand takes top spot with her stylish porch swing. It's such a genius idea, it's hard to believe it actually started life as an IKEA bed frame.
'The bed frame I used is discontinued, but a queen sized Tarva is basically the same,' says Hanna. 'I cut the legs off, then cut the whole bed to the width of a twin size mattress.'
Hanna removed the end panel from the part of the bed she wasn't using and attached it to the part with the headboard on that she'd cut. 'I had to redrill the holes, so I could attach it back on,' says Hanna. 'That was the trickiest part of the project.'
For this genius IKEA bed hack, Hanna made armrests from the scrap wood and added two 4x2s (pieces of wood that measure 2x4") underneath to support the swing. Lastly she painted it and hung it with hemp rope. 'My husband knows all the boy scout knots,' she adds.
The Livingetc newsletters are your inside source for what’s shaping interiors now - and what’s next. Discover trend forecasts, smart style ideas, and curated shopping inspiration that brings design to life. Subscribe today and stay ahead of the curve.
What you'll need for this IKEA hack:
- queen size Tarva
- mitre or table saw
- drill and appropriate sized raw plugs
- paint and brush or roller
- hemp rope
2. Turn a Forhoja cart into a pretty potting bench
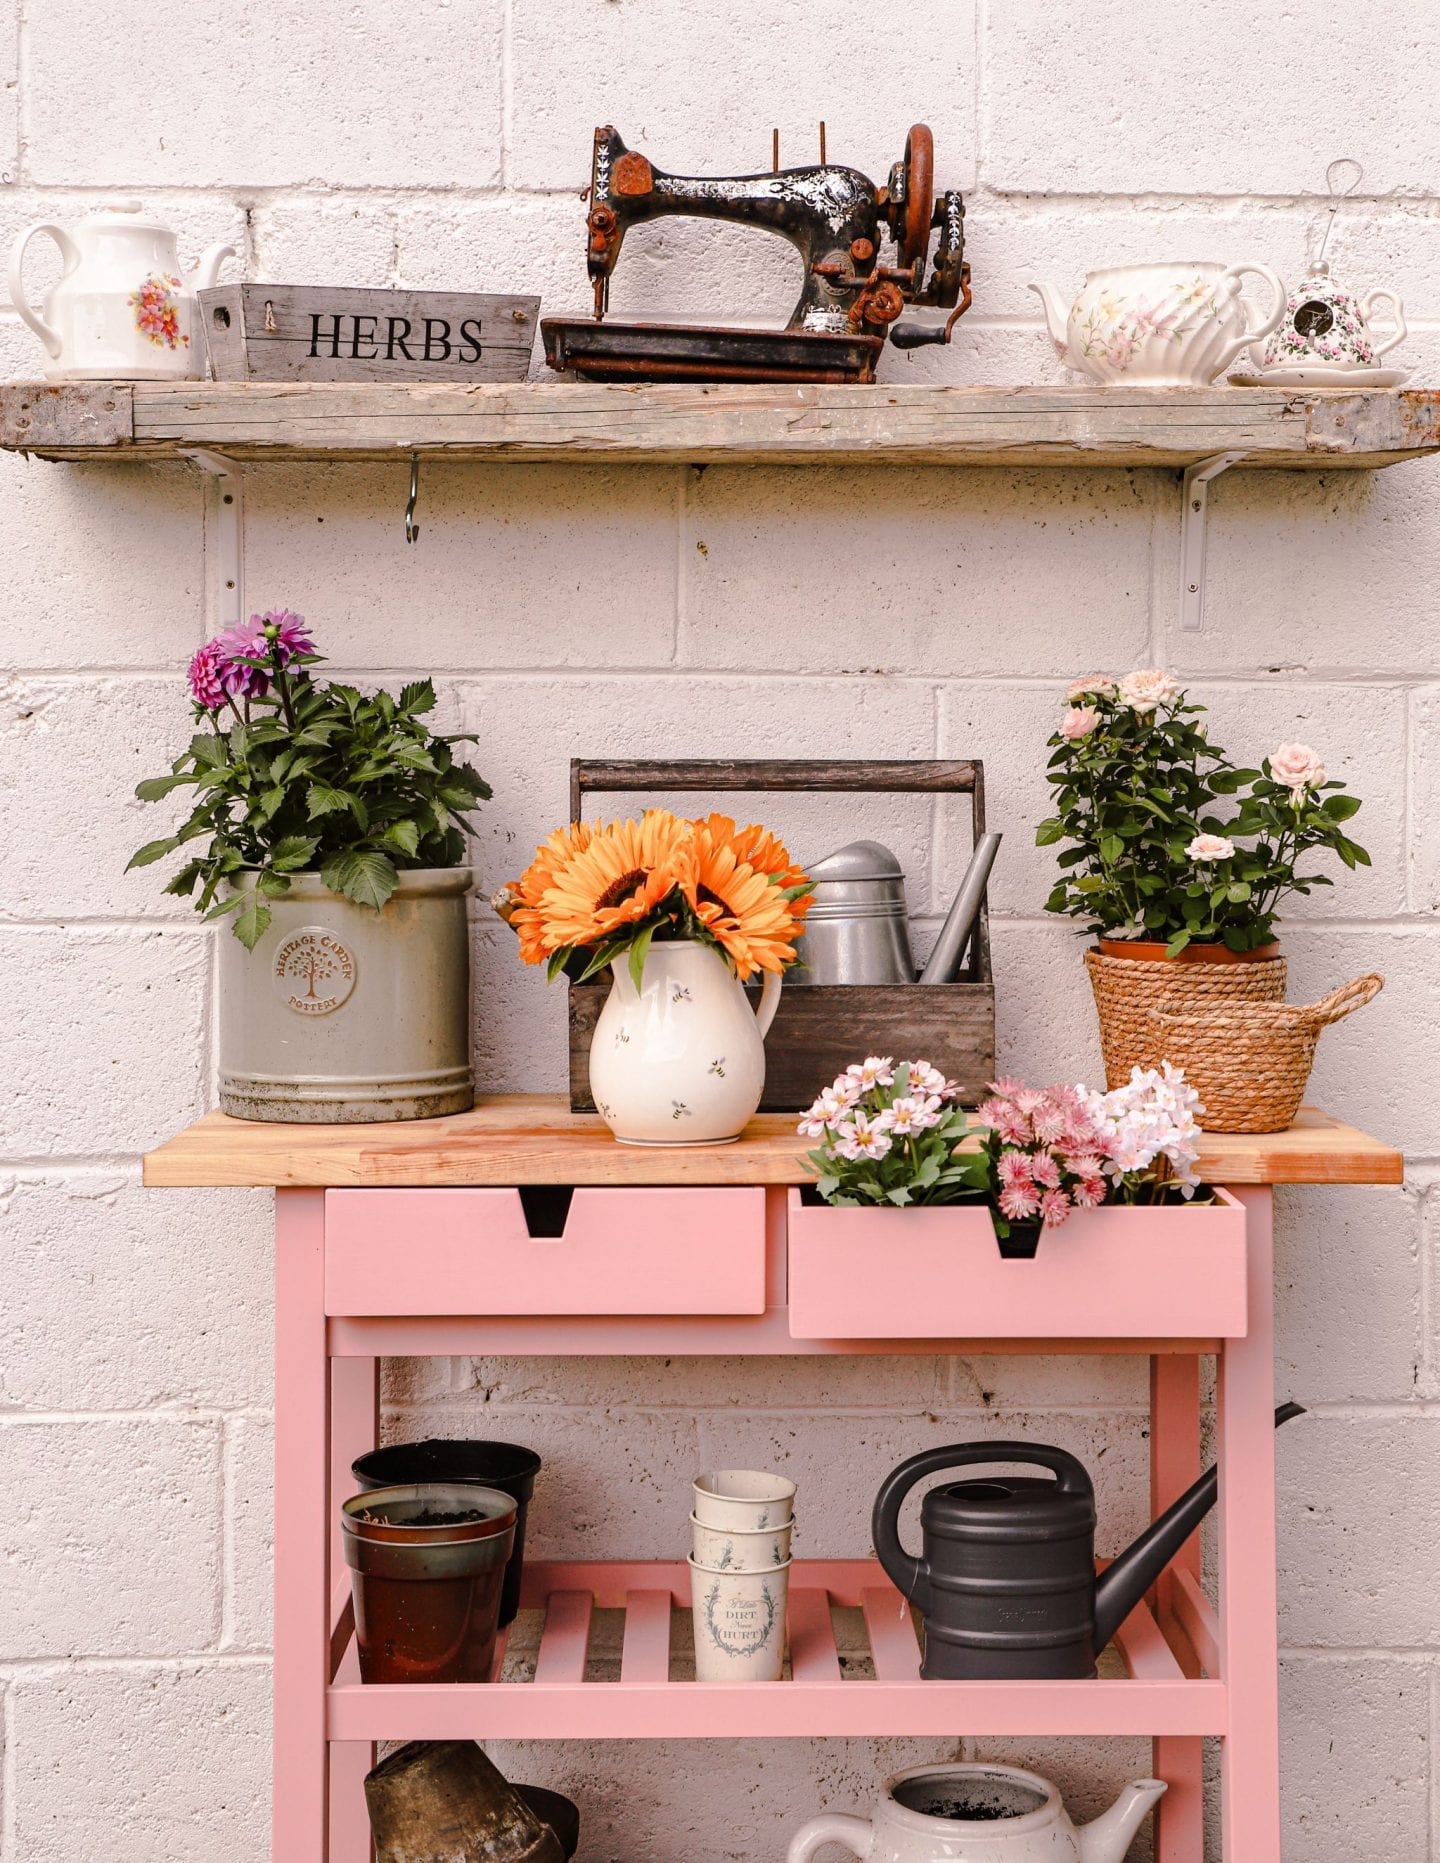
Over at @daintydressdiaries, blogger and DIY enthusiast, Catherine has turned an IKEA Forhoja cart into a pretty potting bench. Yet another permutation of the beloved IKEA storage hack.
She was originally going to make a bench from scratch but turned to IKEA instead, as the brand often has smaller pieces of furniture she thought might suit. She spotted the Forhoja cart and noticed people on pinterest were hacking it for their kitchens.
'I decided to use it in the garden as it's nice and narrow and can be easily moved,' says Catherine. 'I painted it with Autentico Versante matt in the shade “Blushed”'.
Catherine likes this chalk paint because it includes primer, so you can paint it straight on to the wood and it's easy to apply. She suggests painting two thin coats, and advises not loading the brush or roller with paint, as this creates mess and spray. She decided to leave the worktop unpainted as she liked the rustic effect of the finish and it works well with the pink frame.
It's worth adding an extra layer of sealer to your project to protect it outside. And covering it over during the winter to protect it from the elements. It's also best to not stand wood furniture on grass as it can rot, so place it on some decking boards, large tiles or slabs if you can.
'The trolley itself has a wide enough shelf area so you can store any of your unused pots or containers of compost,' says Catherine. 'I also added a shelf above my potting bench by drilling in some brackets and adding an old scaffold board shelf to it. It feels so good to finally have an area in the garden to work from. I've added some trinkets that I had lying around to style it up, so it's pretty as well as being practical.'
What you'll need for this IKEA hack:
- Forhoja cart
- primer, paint, brush and roller
- sealer or matt varnish
3. Give Ivar a lush look for your greenhouse
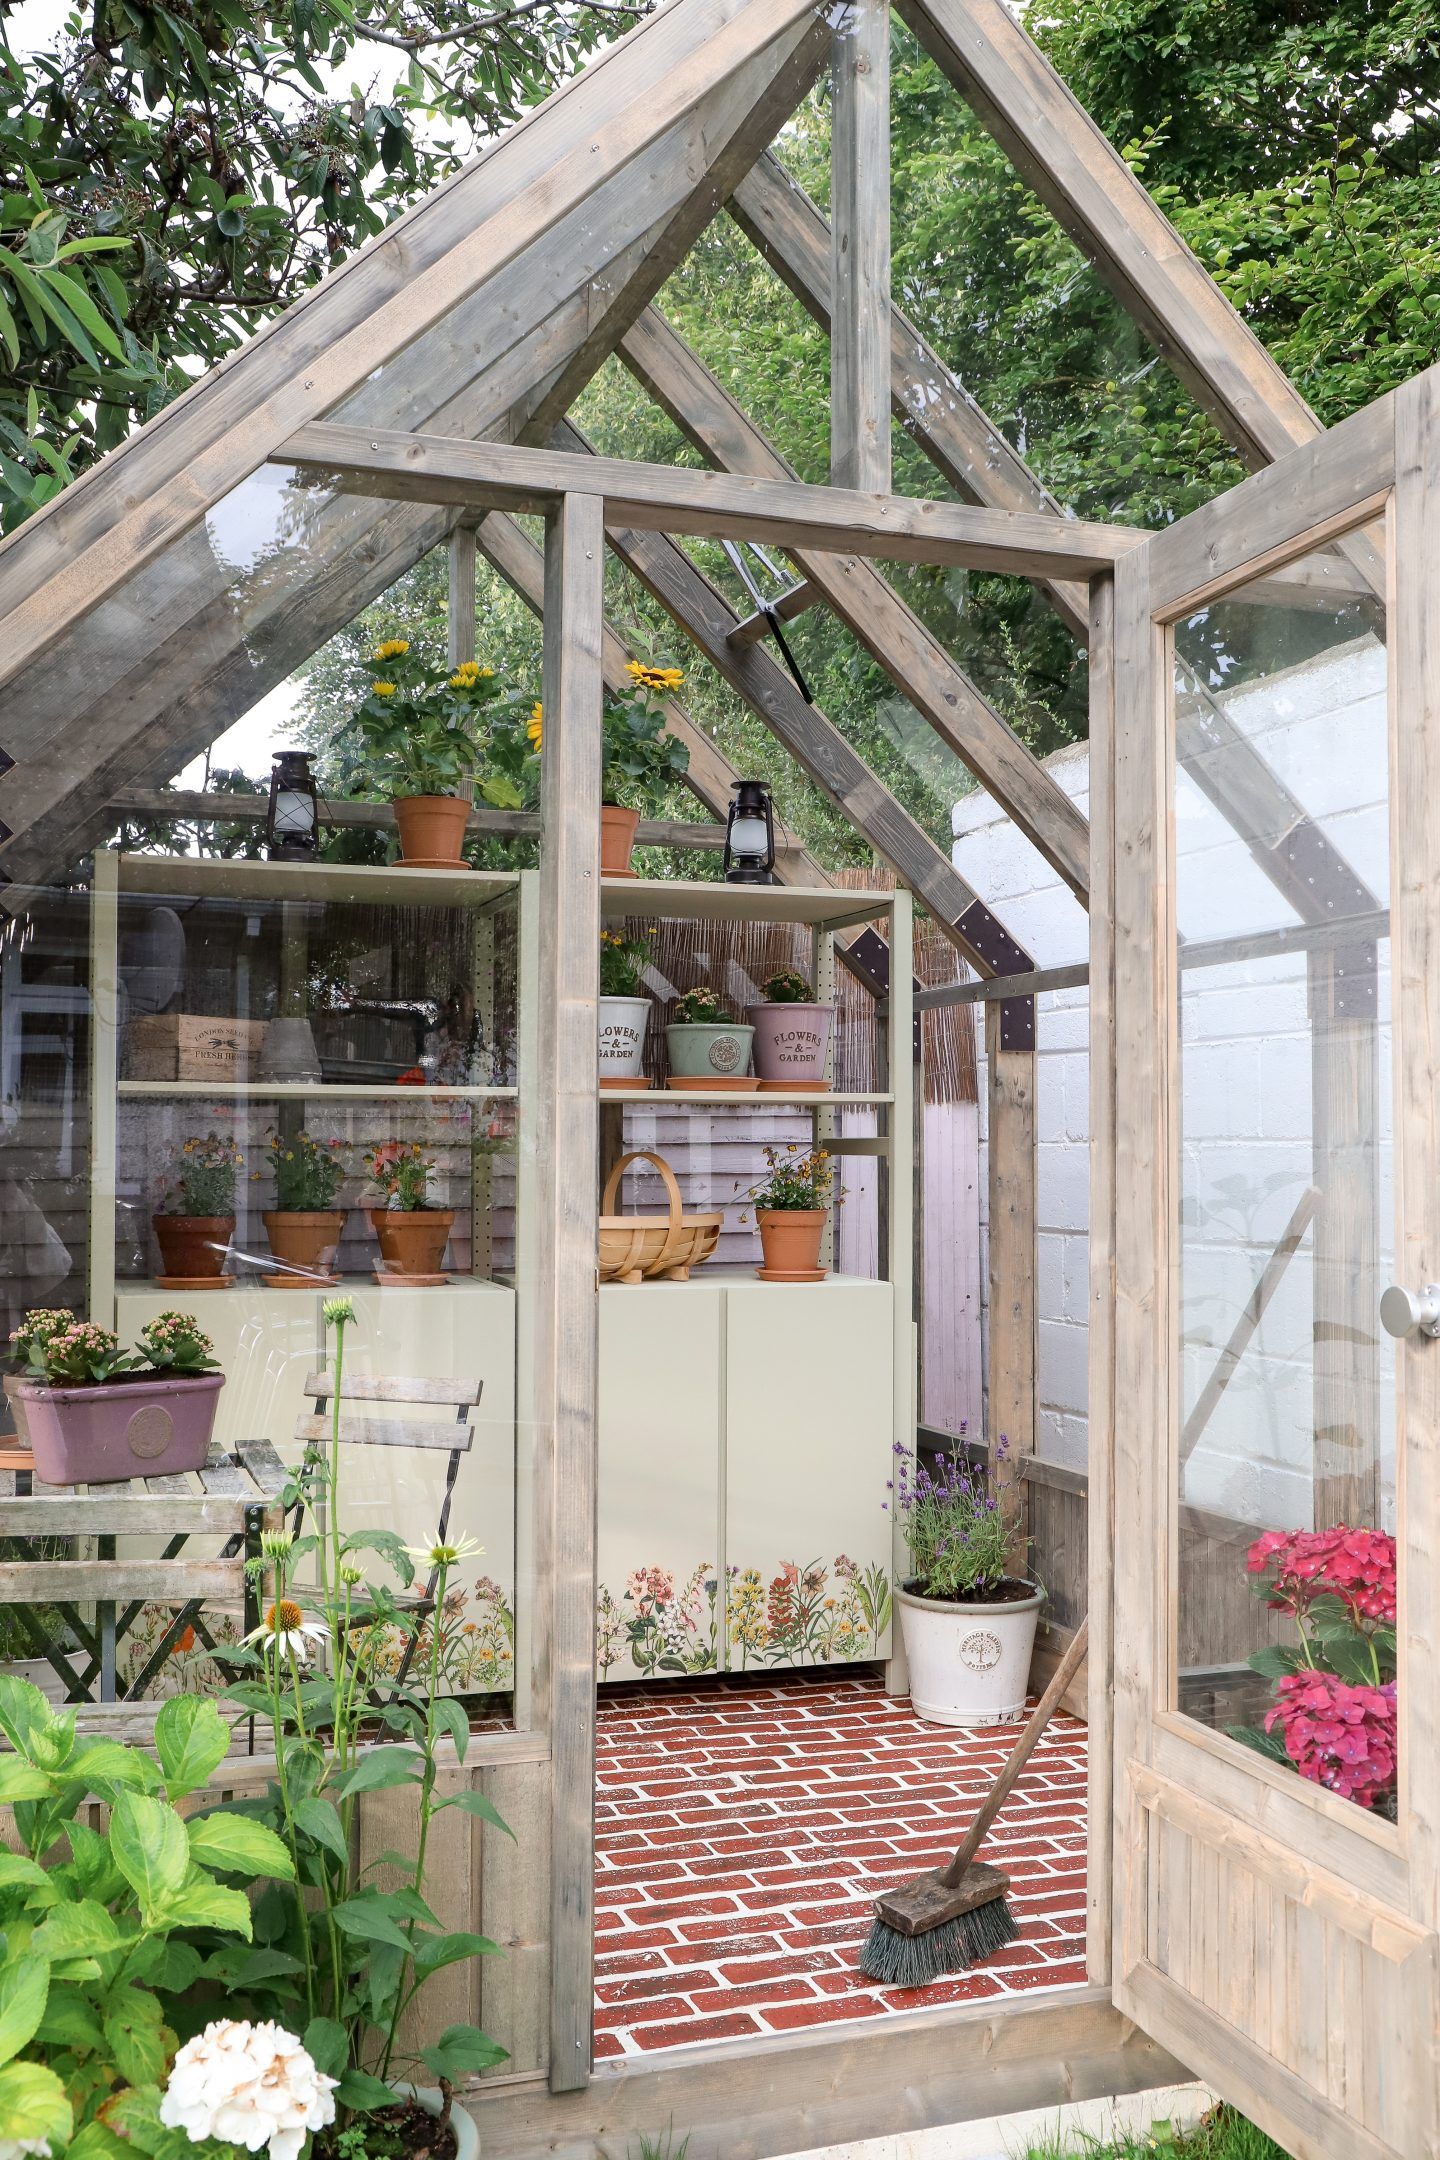
Another of Catherine, @daintrydressdiaries IKEA garden hacks was this charming storage unit for her greenhouse. Not content with the basic metal and plastic shelving she was finding online, she turned to the Swedish retail giant and discovered the Ivar shelf unit.
'I loved that the Ivar system is interchangeable and customisable, so I went with the two-tiered option with cabinets,' says Catherine.
Before assembling the shelving, Catherine sanded the wood to give it a 'key' for the paint to adhere to and cleaned it with degreaser prior to painting it.
'The Ikea Ivar is softwood and has knots, which can bleed over time,' says Catherine, a top bit of advice for anyone wondering how to paint IKEA furniture. 'Prime these knots with a stain-blocking primer. I'd also recommend one coat of primer applied all over, as it will stop it from drinking all your paint.'
Although offering that advice, Catherine says she 'cheated'. 'I used Autentico Versante Matt in the shade Kiwi. This paint has a built-in primer and is self-sealing. It took two coats but it absorbed a lot of paint.'
The paint job took six hours, as Catherine coated both sides of the cabinet doors and frame. She also left plenty of drying time between the coats and before applying floral transfers, seaking them with matt varnish and putting the piece together.
It wasn't the easiest piece the DIY enthusiast has assembled (it needs two people) and at first it seemed a little wobbly. That was until she drilled the brace in to the back, which made it sturdy.
'It's also worth noting that the Ivar system needs to be secured to the wall or frame behind it to prevent a topple risk. While the shelves are sturdy and made from thick wood, the frame is more flimsy, and if a child climbed on them, I think the wood could snap,' says Catherine.
'While Ikea didn’t make these with the intent of kids climbing them, I have a nephew, and I know appealing this could be for a climbing expedition.'
The job took a whole weekend in total but it's an impressive result.
What you'll need for this IKEA hack:
- Ivar shelf unit
- drill and screws (to attach Ivar to the wall)
- primer, paint, brush and roller
- transfers
- matt varnish
4. Give the Äplarö table a stylish new look
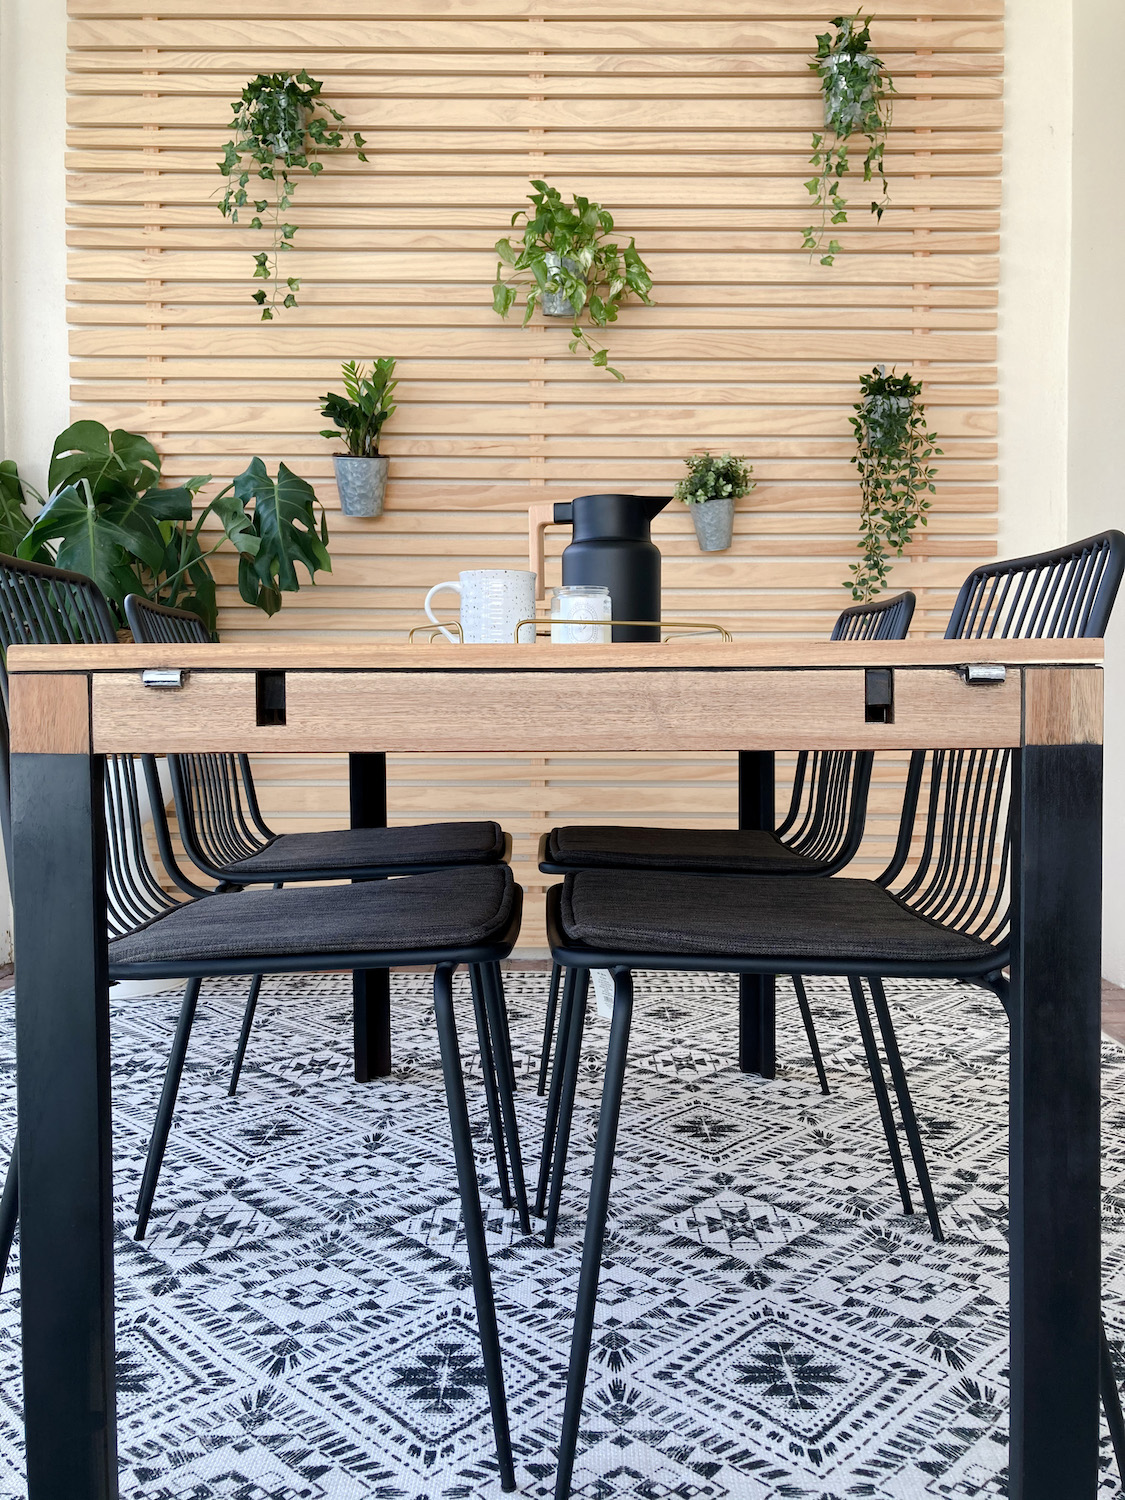
Kim Bui @xomyhome gave an old IKEA äplarö patio table a chic makeover as part of a new look for her screened porch.
Wanting to extend her family's living space to include the porch, but not envisioning the old patio table as part of the refreshed look, Kim came up with the hack.
'I had an ÄPPLARÖ patio set from Ikea but the red stain on it did not fit the vision I had for this space,' says Kim. 'I didn’t want to invest in a new patio set, nor did I want to go through the trouble of selling it online at a time where we were all keeping our social distance.'
Kim used a power sander with 80 grit sandpaper to sand the red stain from the top, sides and legs of the table. 'I didn't sand between the slats as the red stain there didn't bother me,' says Kim. 'You could if you wanted to, but the task would be a lot more time-consuming.'
Once the table was down to raw wood, Kim hand sanded it with 220 grit sandpaper to give it a really smooth finish. Then she wiped it with a wet cloth to remove any debris and let it dry thoroughly.
She used frog tape to mark the lines where she wanted the black stain to go on the legs then sprayed them with Rustoleum enamel paint.
Kim used a polycrylic matte varnish to seal the wood, but says it has a slight sheen. 'If I did it again I'd try the soap finish method that I saw from @mymodern.com,' she says.
What you'll need for this hack:
- Äplarö table
- power sander and 80 grit sandpaper
- 220 grit sandpaper
- can of black Rustoleum enamel paint
- clear polycrylic matte varnish and brush
- frog tape
5. Remodel the Hyllis into a hanging herb garden
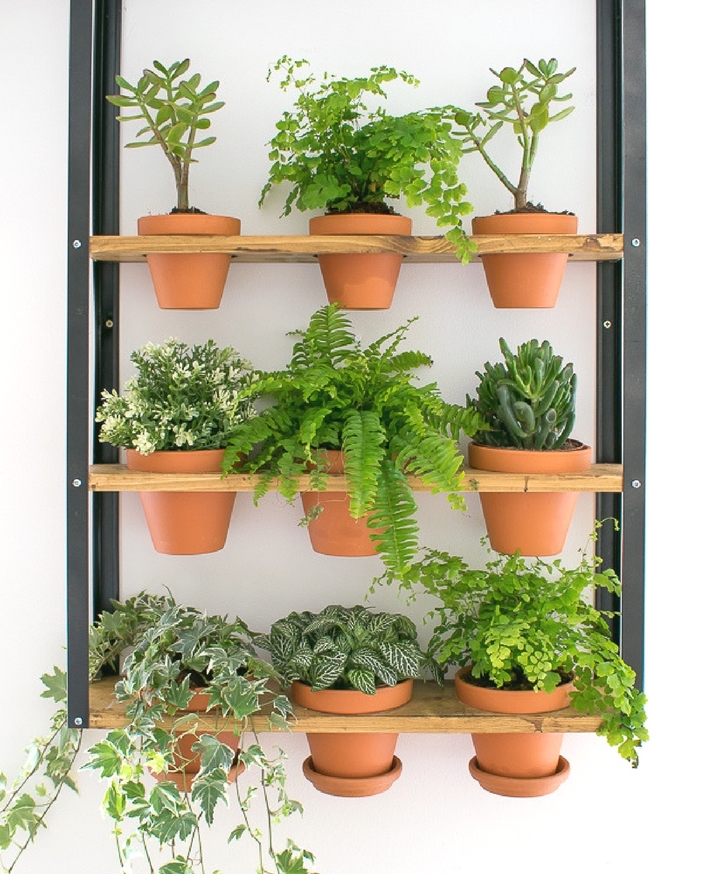
Medina Grillo at grillo-designs.com has no shortage of IKEA hacks up her sleeve. For this one, she took an IKEA Hyllis shelving frame and created an industrial wall planter. Medina actually has this in her dining room, but it could work just as well on an exterior wall in the garden, or in a sheltered spot on a patio or terrace, filled with herbs or outdoor plants.
She was originally going to use regular metal pipes for her industrial planter, until she saw the price of them. The IKEA Hyllis was an inexpensive alternative.
Medina roped her husband in to help. He cut the Hyllis to the size she wanted, as well as the wooden planks for the shelves, then drilled holes in the brackets, leaving enough clearance for the pots. He added a couple of extra holes in the rear bracket to mount the shelf to the wall.
She spray painted the frame black, while her hubby measured and cut the holes for the plant pots (slightly smaller than the circumference of the top of the pot, so they sit in place).
The shelves were sanded, stained and sealed and attached to the frame, then it was ready to be drilled to the wall. Finally she added the pots and glued pot saucers to the pots on the lowest tier for water drainage.
What you'll need for this IKEA hack:
- Hyllis shelving unit
- wood planks
- wood stain (in color of choice)
- metallic spray and optional primer
- hand saw (with metal cutting blade)
- hole saw kit and drill
- varnish
- wood filler
- glue
- 9 terracotta pots
6. Pimp your planters
A post shared by 🔓 IKEA Hacks Do It Yourself (@ikeahacksdiy)
A photo posted by on
This is a nice and easy yet effective IKEA hack from @ikeahacksdiy for those who aren't as handy with a saw or a screwdriver.
These plant pots are discontinued but you could easily achieve a similar look with the new Vitlök. Although white, these pots are made from steel, so epoxy glue is best.
Simply glue the two bases together and you have an elegant tall planter, that looks like it cost a lot more than a couple of IKEA pots. Fill them with lush evergreens for year round foliage.
What you'll need for this IKEA hack:
- 4 Vitlök plant pots
- epoxy metal glue
7. Fashion a laptop table into an outdoor bar
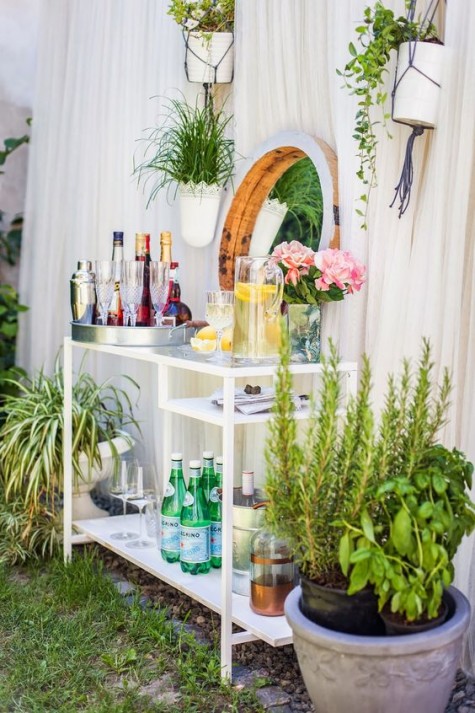
Home bars whether indoors or outdoors are a big interior design trend. So if sipping negronis in the garden sounds fun, this is the hack for you.
Creating your garden bar doesn't need to cost a fortune. With a clever IKEA hack you'll save big bucks, which you can spend on glamorous glassware for serving your cocktails and aperitivos.
This one shown on shelterness.com could be achieved with an IKEA Alex desk or the Vittsjö laptop table. Just make sure whichever model you buy has the support bars on both sides of the frame so you can add a shelf for your mixers and ice bucket. Both models mentioned have metal frames, so should be able to stand up to inclement weather, if an unexpected rain shower arrives.
What you'll need for this IKEA hack:
- Alex desk or Vittsjö laptop table
- spray paint in a color of your choice
- a piece of timber cut to size for the lower shelf
8. Style Forhoja into an outdoor kitchen counter
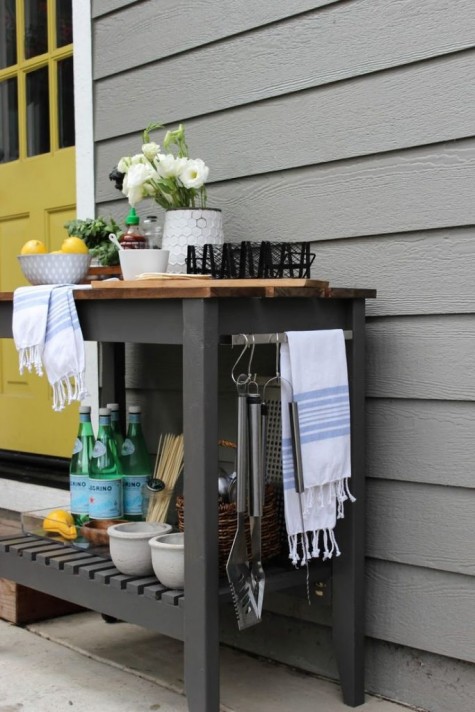
IKEA's Forhoja cart is clearly a versatile piece as this is another great garden hack. If you prefer grilling to growing, Forjoha makes a fabulous outdoor kitchen counter (as well as a potting bench).
This time the timber trolley has been given a lick of graphite grey paint. Farrow & Ball's Down Pipe would be great if you like leaden shades. The countertop has been left bare again - it's clearly a combo that works well.
This time a Kungsfors rail has been attached to the side to hang cooking utensils. Place it beside your barbecue or pizza oven, for a simple fix that will make al fresco entertaining effortlessly elegant.
What you'll need for the IKEA hack:
- Forhoja cart and Kungsfors rail
- paint of your choice, brush and roller
- drill
9. Give Råskog trolleys a bar cart twist
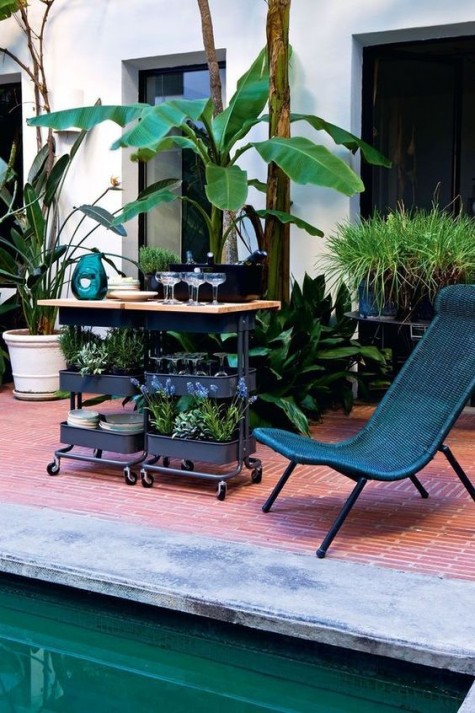
We've seen some impressive IKEA hacks for the outdoors. However, an IKEA garden hack doesn't have to be difficult or complicated to get good results.
This bar cart is another simple project. It's just two Råskog trolleys secured together, with a piece of timber secured over them for the countertop. This could easily be a temporary set up for an afternoon's entertaining. There's space on the shelves for plates, glassware, favorite tipples and herbs for your cocktails.
Although, if you're going to want to balance heavy items, or use the surface for slicing lemons and pouring drinks, we'd suggest buying the Högsma chopping board toppers which fit securely. If you'd prefer a larger surface you could secure it in place by sticking furniture pads underneath (measured out so they sit snugly in the corners of the tray below) so it's less likely to topple.
What are IKEA hackers?
IKEA hackers are an inventive bunch, who give the Swedish retailer's furniture and accessories their own clever twist. Hacking is popular with interior designers and influencers too, who give the customisable furniture an upscale look with elegant additions and details. Many have become social media sensations by turning basic items into bespoke-looking pieces.
There are professional hackers too, with cool companies such as Superfront, Custom Fronts and others who design doors and worktops specifically to fit IKEA kitchens and other pieces.
Jacky Parker is a freelance lifestyle journalist and writer, producing a wide range of features for magazines and digital platforms. She has written for Livingetc and its sister titles, Homes & Gardens and Country Homes & Interiors for more than 15 years, both as a freelance contributor and as Acting Digital Editor and Acting Style Content Editor, regularly reporting on the latest interiors, gardens and wellness inspiration, speaking to experts in their respective fields, and discovering the best tips.
Jacky has also written for other publications, including Sunday Times Style, The Telegraph, Architectural Digest, House Beautiful, ELLE Decoration, Red, Grand Designs and more.