IKEA’s PAX is the iconic Scandi wardrobe that DIY influencers and bloggers love to upcycle. From stylish built-in closets to chic walk-in wardrobes, learning how to customize IKEA PAX seems to be the DIY everyone should know about. Not only do they look great when you start to add your own style, it's such an affordable way to get a more bespoke look on a budget.
If you have ever perused the wardrobe section of IKEA, you'll know that PAX customization really begins on the inside. The PAX system is built around personalization, and the range of inserts ensures that it fits your storage needs. You can opt for ready-made PAX interiors, or IKEA’s PAX Planner is designed to assist in the customization process – and then once you have your storage system covered, that's when you can start getting creative with your IKEA hacks.
Read below for our top tips on how to make the PAX wardrobe completely customized, both inside and out.

How to customize an IKEA PAX wardrobe – 7 steps to create a design that's personal to you
1. Measure the space
PAX frames come in multiple sizes: 201 or 236 cm tall; 50, 75 or 100 cm wide; 35 or 58 cm deep.
The best way to ensure your PAX is customized to your space is to measure the space you will be slotting it into. If you intend to add doors to your wardrobe, you should allow an extra height clearance of 1 cm for hinged doors or 4 cm for sliding doors.
If you are lucky enough to have space for a walk-in closet, make a floor plan of the space with accurate measurements to make planning easier. This is also vital to ensure you do not cover any plugs, vents, or radiators.
Because there are multiple width units available – 50, 75, and 100cm – you can use IKEA’s PAX planning tool to play around with different unit combinations and to visualize what will work in your space. If you are planning to have a corner wardrobe, the planning tool can also visualize this, and ensure you get the right units for the space.
Take your measurements twice to be certain that they are accurate. If your space is too small for the PAX but your heart is set on this classic wardrobe system, read below for tips on cutting the PAX down to size.

2. Choose a finish
IKEA PAX frames are sold in three finishes: white, black-brown, and white-stained oak effect. You should consider which finish complements your space the best. And which is going to work if you are thinking of trying out some IKEA wardrobe hacks or painting it.
White is a classic choice for a clean, sleek look. The lighter oak has the same impact as the white with a homelier feel, whereas the darker black-brown finish has a moodier impact. In smaller spaces, opt for lighter colors to keep the room looking bright and open.
If you intend to paint your PAX, opt for white or white-stained oak as it will be easier to prime and paint over than the darker black-brown finish.
3. Doors or no doors?
IKEA provides sliding doors and hinged doors for their PAX wardrobe system, all in a range of styles, colors, and finishes. Hinge doors are more traditional, whereas sliding doors offer a modern, sleek look and can often fit better in tighter spaces. Alternatively, you can choose to go doorless, which is useful for narrower spaces, or walk-in wardrobes.
If you opt for doors, you should ensure you account for them in your measurements: 1 cm for hinged doors or 4 cm for sliding doors.

4. Plan the inside of your PAX wardrobe
IKEA sells a vast range of inserts for its PAX wardrobe system – including drawers, baskets, trays, and rails – all of which ensure a custom finish to your wardrobe.
'When creating your wardrobe around the Ikea Pax system – always start with who you are and what your needs are,' suggests customization experts, Superfront.
'Does your work, for example, require a formal outfit including perhaps suits or shirts that can’t be folded into a drawer? Well, then you need plenty of hangers to keep these garments looking good! If you instead dress more casually on a daily basis, you might want more drawers.'
If you are not too picky with your bedroom storage system, let IKEA do the work: there are pre-filled PAX options available to purchase, you only need to pick a size. If you want a truly custom wardrobe experience, though, you can design your PAX wardrobe using IKEA’s dedicated online PAX Planner.
Start by considering your needs and where you like to keep things. For example, some people fold their jeans, but you might like to hang your jeans up. If you plan on hanging clothes upon rails, you should also measure the longest item you plan to hang up to ensure you leave a tall enough space.
Similarly, consider practicality: glass-front drawers look nice, but do you really want your socks on display? Make the most of opaque front drawers, or mix and match for different uses.
5. Make the most of the range of inserts available
Instead of opting for the default PAX inserts, like rails and shelves, consider the more unique options on offer, like the pull-out tray with jewelry or shoe inserts, or the pull-out trouser hanger. There are over 200 PAX interior organizers, so take some time to scroll through everything on offer.
'Really consider how you will actually use the space, rather than just aesthetic value,' says Malcolm Begg of DesignSixtyNine.' There’s an excellent range available but planning how they’ll be used is key to getting it right.'

6. Consider interior embellishments
IKEA offers a range of bedroom lighting options to go with their PAX wardrobes, whether that is strip lights inside cupboards and drawers, spotlights above the wardrobe, or moodier, glowing lights inside.
You could also paint or wallpaper the inside of your PAX wardrobe to inject excitement into the room when the doors are opened. Read below for more tips on customizing the look of your PAX wardrobe.
7. Fill the adjustment holes if you are ready to commit
Once you have fitted your PAX wardrobe and its shelves and inserts, and you are happy with the placement of everything, fill in the adjustment holes for a more complete, bespoke look.
This can be done with caulk, stickers, or IKEA’s VARIERA cover plates, which were designed for this purpose.
Do this after living with your PAX wardrobe for a while, and toying with the location of things, to ensure you are satisfied with the placement of everything.
How to customize an IKEA PAX wardrobe – 7 simple and stylish ways to adjusting the exterior
If you are satisfied with the inside of your PAX wardrobe but you think the outside needs sprucing up, there are many ways that you can do this. But first…
1. If your space is too small, cut the PAX down to size
If you're dealing with a small bedroom where space is too tight for the PAX but you have your heart set on this wardrobe, try cutting the PAX to size. DIY blogger Malcolm Begg, for example, cut his PAX wardrobe diagonally to fit his sloping ceiling.
Interior bloggers Viv & Tim similarly found that their space was slightly too small to house the PAX, so they opted for DIY. 'We were a little unsure if it would actually work to cut the frame in order to fit but it actually turned out really great and you can't notice the difference!' says Viv.
To do this, take your measurements and cut the top and bottom portions to size before building the PAX. 'We left around 0.5 – 1 inch of extra space just in case,' says Viv.
Use a saw to do the cutting. 'We don’t have a table saw (too big and too expensive), so we used a circular saw and a track to cut the wood, and we’ve had good results using this method! It’s not exactly the best way to do it, but it gets the job done,' says Viv.
Make sure that you cut the backboard to size, too. 'We used a box cutter to cut the backboard to size after. Heads up, this was the most time-consuming part!'

2. Change the hardware on your PAX wardrobe
'You could add some handles to the doors for a more high-end look,' recommends designer Hayley Stuart. IKEA sells many hardware options, but you can also easily find custom hardware elsewhere. For a touch of elegance, match your wardrobe hardware to other details in the room, like light fittings.

3. Decorate the doors on your PAX wardrobe
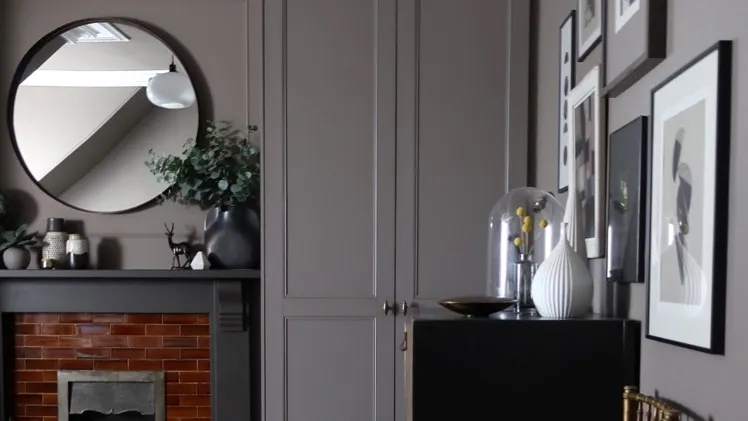
Whether you add moldings or mirrors, or repaint or wallpaper, you can spruce up your PAX wardrobe by redecorating its doors.
'You could paint them a solid color, create a mural or paint arches on to give the illusion the doors are a different shape,” recommends Haley Stuart. 'Just be sure to use a water-based primer and interior eggshell for a long-lasting finish.'
'Try painting the doors the same color as your walls for a sleek and calm feel,' recommends interiors blogger Christine of Little House on the Corner. 'Or add paneling to add a pattern and interesting texture.'

4. Replace your PAX wardrobe doors entirely
IKEA offer lots of door options for PAX wardrobes, and replacing the door could be all you need to rejuvenate your wardrobe.
However, if IKEA’s options do not take your fancy, you could try a company like Superfront, who also makes a range of wardrobe doors suitable for IKEA’s PAX wardrobe.
Whether you want your wardrobe to blend in with your walls or to add a pop of color or a pattern, Superfront has lots of doors to choose from (they are great for IKEA kitchen hacks too). They recommend: 'Have a look around at the rest of your home to make your wardrobes harmonize with the rest.'
'Our aim is to make it possible for people to create something very personal and unique at the same time as making it easy to upcycle existing IKEA wardrobes, and thereby make it easier to decorate in a circular way. If we can double the life of all IKEA cabinets out there, a lot is gained from an environmental point of view.'

5. Extend your PAX to reach the surrounding ceiling or walls
'Adding paneling to the front of Pax doors can be more than just decorative,' says Christine. 'Extend it over the edge of the door and up to the ceiling to give the wardrobes a high-end and built-in look with minimal effort.'
'Adding framing and moldings to the side is what really makes this hack look bespoke and fitted,' adds Malcolm Begg. 'Everyone concentrates on the doors but the visible sides are equally important.'
'Trim out the shape of your skirting boards at the back to ensure a neat, ‘fitted’ look against the walls, and add skirting to the bottom to disguise the flat-pack look,' Begg recommends.

6. Add a wood trim or baseboard to make your PAX wardrobe look built-in
It's such a simple trick and can give a PAX a much more bespoke, built-in look. Simply add beading or molding around the edges of your pax so they seamlessly fit into the walls rather than floating in the space, with gaps around the edges.
'Raising the PAX units to allow for a baseboard and crown molding will make the pieces feel the most custom and built-in,' says designer Erin Kestenbaum. Hayley Stuart also recommends that you can 'save money by creating a surround around the PAX wardrobes for a built-in look on a budget.'
7. Consider the rest of the space
To add an extra custom feel to your PAX wardrobes, integrate other furniture into their surroundings.
Jenna Sue of Jenna Sue Design Co, for example, installed a dressing table between two PAX wardrobes to transform her wardrobe space into a fashionable boudoir.
How do you make an IKEA PAX wardrobe look custom?
Using techniques such as repainting, linking colors and hardware with the rest of the room, and designing your inserts so that they suit your purpose are the best ways to customize your PAX wardrobe.
How do you make an IKEA PAX look fitted?
Extending your PAX wardrobe to reach the ceiling or surrounding walls, adding a wood trim or adding a baseboard are the best ways to make your PAX wardrobe look fitted.
Can you paint IKEA PAX wardrobes?
Yes, you can paint PAX wardrobes to create a bespoke wardrobe that fits your space. It's a really simple weekend project that can make all the difference, just check out our guide to how to paint IKEA furniture for a step-by-step.